|
|
Post by dptydawg on Nov 30, 2013 18:40:25 GMT -8
Once again I got of the beaten path of mainstream model building In the early ‘90’s I bought a well used Hess motorhome at the show in Carlisle. It was a sandbox toy that was missing most of the outside add-ons like mirrors antennae and the door. The windshield was cracked and there was a piece missing off the end of the front bumper. I managed to get the thing disassembled then it was abandoned until a week ago. It has become my latest build project.  I don’t have any pictures of it from when I acquired the motorhome but this is the basic model that I’m starting with. The body is in two pieces split horizontally along the beltline. Once it was separated I removed the interior tub and windows. 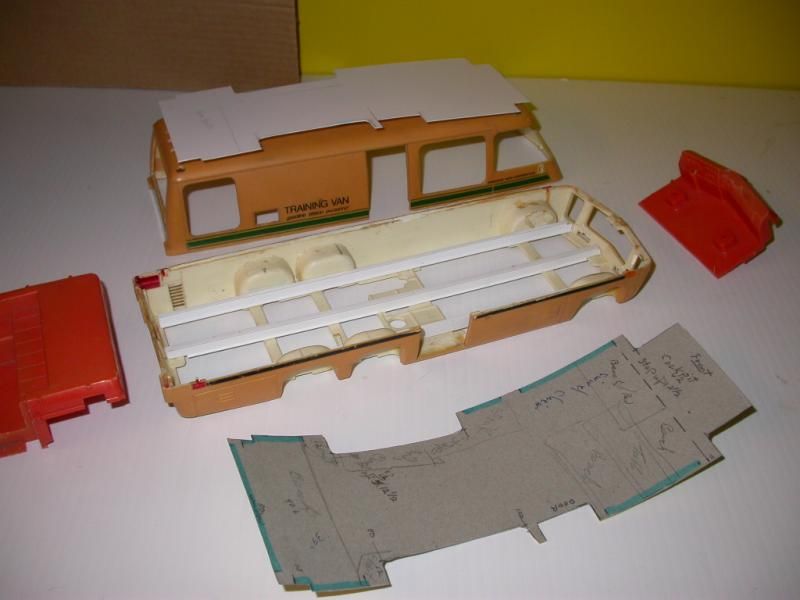 I installed Evergreen channel sills for the new interior floor. Starting with a cardboard template I laid out the floorplan then made a floor from 0.5mm sheet styrene (it’s on the roof in this photo). I cut the cockpit free from the original tub. 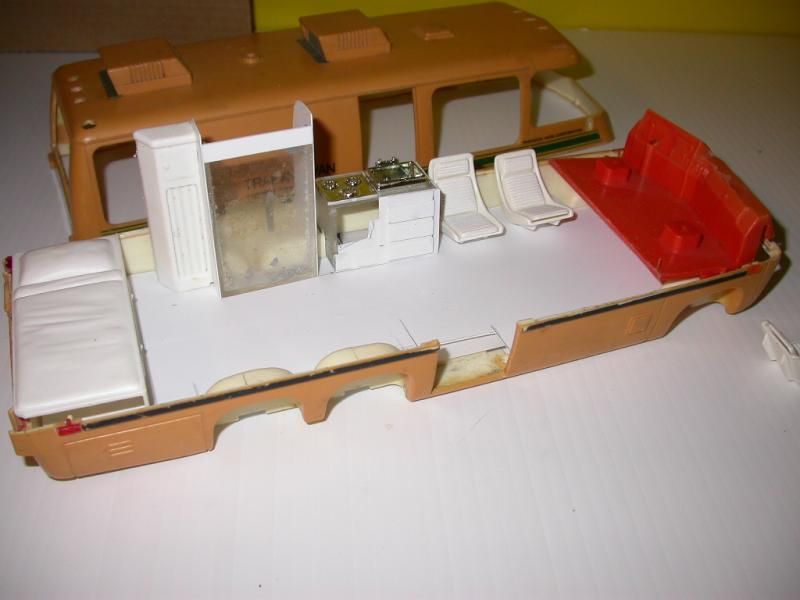 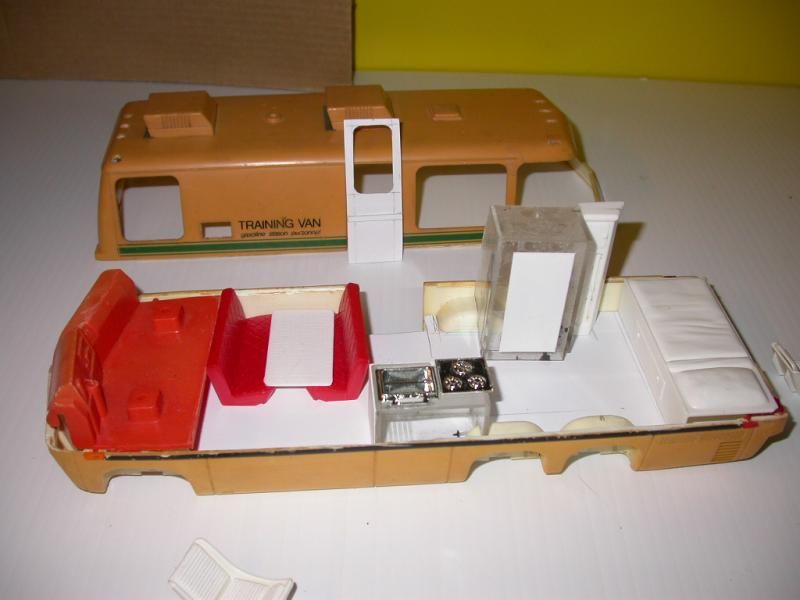 And this is what I’ve managed to get done so far. Things are mocked up and ready for some primer. To put the interior in this motorhome has meant raiding both kits and parts boxes. The rear bunk is from the KW T-600 kit as are the closets next to the bunk. The rest of the cabinets were made from sheet styrene and some plastic boxes that I was saving. The frig, stove, table and sink were pillaged from the Open Road Camper kit. The two red bench seats are from the MPC Ram Van kit.  I rebuilt the broken front bumper with Apoxie Sculpt two part putty. That’s where the project stands as of 1 Dec 13 Thanks for looking Carl |
|
|
|
Post by swamp rat on Dec 1, 2013 15:08:03 GMT -8
i like it..
|
|
|
|
Post by Robert Myers on Dec 2, 2013 12:35:49 GMT -8
I'm jealous!!!!! I have always wanted to do the GMC motor home, but I never did find an affordable one to rebuild.
|
|
|
|
Post by ap40rocktruck on Dec 3, 2013 3:15:49 GMT -8
I'm jealous!!!!! I have always wanted to do the GMC motor home, but I never did find an affordable one to rebuild. I second that! Ap40 |
|
|
|
Post by darkness21 on Dec 3, 2013 9:53:02 GMT -8
Nice work so far that is going to be a fantastic model when finished.
|
|
|
|
Post by dptydawg on Dec 6, 2013 20:09:56 GMT -8
Thanks Guys for all the interest in this project. Many many years back someone form the Toronto Group 25 model club did one of these conversions. I've been wanting to do the same thing ever since. The Hess van came as a glider. the belly pan shows the engines bottom end then a drive shaft and twin screws at the rear. Front suspention is leaf springs I had thought about putting the proper power train into the model but I couldn't find a sacrificial Toranado or Eldorado kit at a price I was willing to pay. So the motor home will remain a glider. I will remove the leaf springs and the rear ends but that's about it for the bottom end. These are a couple I/p shots of the model before it heads for primer. 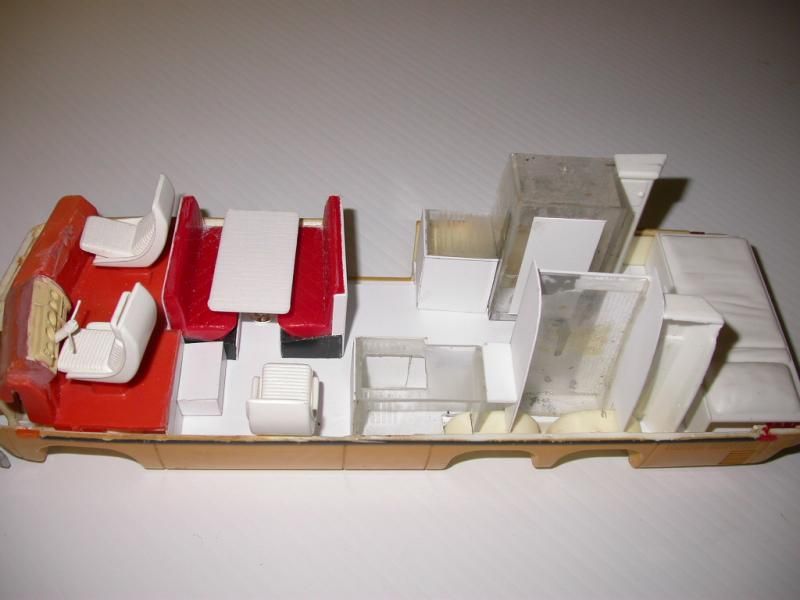 This is the final interior layout. The interior will have a lot of wood grain and bright colours 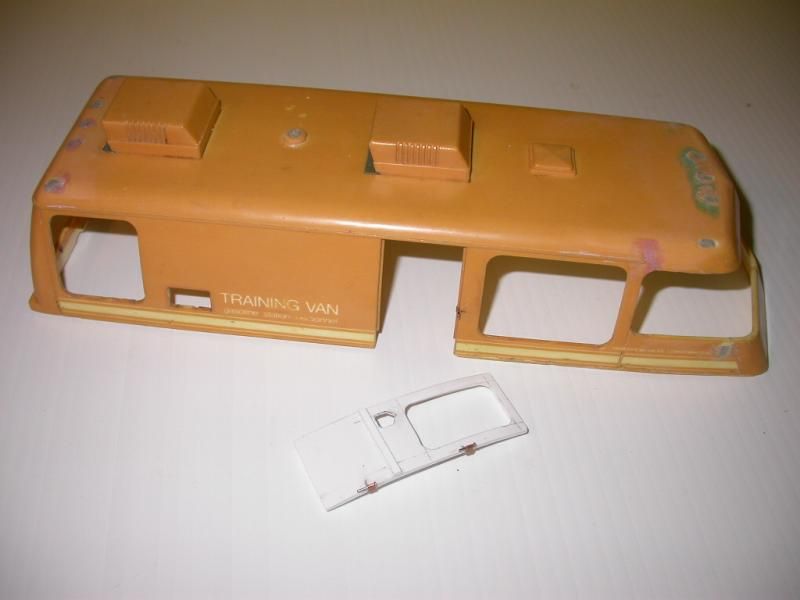 The upper hull with holes plugged and ready for primer. The door has copper strip hinges and a hole for a slam lock. I now have all the parts in gray primer. I'll get some more progress pics up soon Thanks Carl |
|
|
|
Post by gatorincebu on Dec 6, 2013 22:20:35 GMT -8
Carl,
I really like what you have done thus far! The interior layout looks about right ( can you say custom order??? lol ) As far as the engine and drive train go, a curbside model works. After all most people would be more interested in the interior any way.
Just my $.02 's worth!
Be Well
Gator
|
|
|
|
Post by ap40rocktruck on Dec 7, 2013 5:27:07 GMT -8
here is a link for a fellow that might just be able to help with the Eldo / Toro engine & trans at a reasonable price. www.fredsmodelworldonline.com/Highly recommended to anyone looking for "Builder" prices & old built ups. Super nice guy to deal with. Ap40 |
|
|
|
Post by dptydawg on Dec 10, 2013 13:02:54 GMT -8
Thanks again everyone for the interest in this project. Here are some updates on the motorhome.

The hull halves in grey primer. I have since painted them in Krylon CELERY I had a few thin spots on the lower hull so after 2 days drying time I gave it another coat. Bad idea!
In places the paint crazed and cracked, in others it just was rough. I'll let it sit for a day or so to cure then try to sand and buff it smooth. I'll be leaving the upper shell as is.
I've also been adding colour to the furniture.
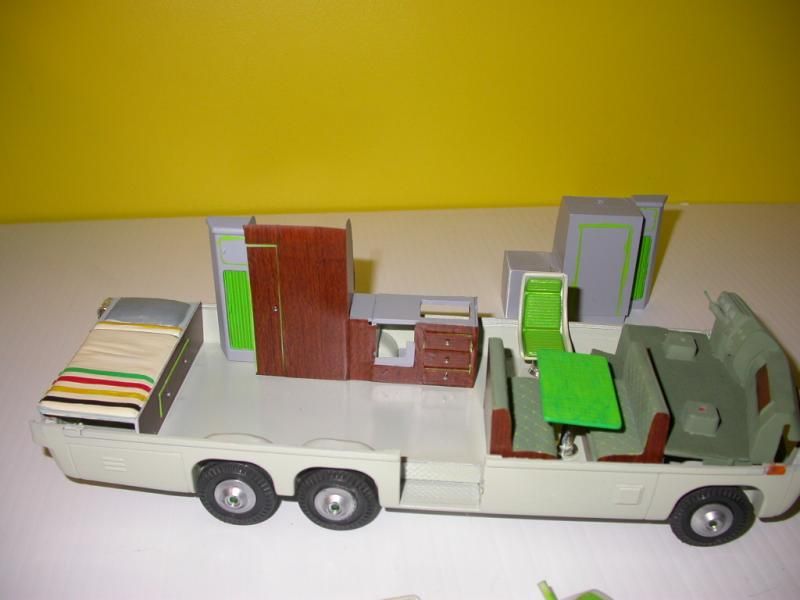
Here is my colour scheme. Wood grain on most surfaces( Cherrywood MacTac), Bug juice green highlights and cockpit green for the rest. This is still a work in progress. The bunk has a Hudson's Bay blanket on it. The tires and wheels are stock. I de-chromed the wheels then repainted them with bump chrome paint.

I sectioned the belly pan to get rid of the drive shafts and battery box. I ground off the interaxle driveshaft and the front leaf springs. Once I get the lower hull's paint problem sorted out I instal the axles and belly pan along with sheet styrene to replace the cut out bits .
Thanks Carl
|
|
|
|
Post by darkness21 on Dec 10, 2013 13:20:29 GMT -8
Looking sharp i like it cool indeed
|
|
|
|
Post by Muleskinner on Dec 10, 2013 14:33:00 GMT -8
Now this is looking great!!!
|
|
|
|
Post by gatorincebu on Dec 10, 2013 17:22:32 GMT -8
Yup , I agree with trucks05 and William. looking good . I like the colors you are using for the interior!
Oh , and what Rick said about Fred. I whole heartedly agree. He is a great guy to deal with. And
you should be able to get the parts you need at a decent price.
Be Well
Gator
|
|
|
|
Post by dptydawg on Dec 12, 2013 12:19:03 GMT -8
Thanks Guys for the lead on Fred's. I have decided to leave it as a glider. There is enough head scratching/banging going on without having to fit in a power train too  A quick update on this project. The paint on the lower hull looks like it was stone guarded to the belt line. I have wet sanded it and it looks smoother. I'll give it another go before paint. I probably should decant some paint from the rattle can and use an airbrush this time to apply it. might be able to avoid another episode of bad paint. I have finish all the furniture in the interior and the cockpit is complete. here is the latest round of mock up pictures.  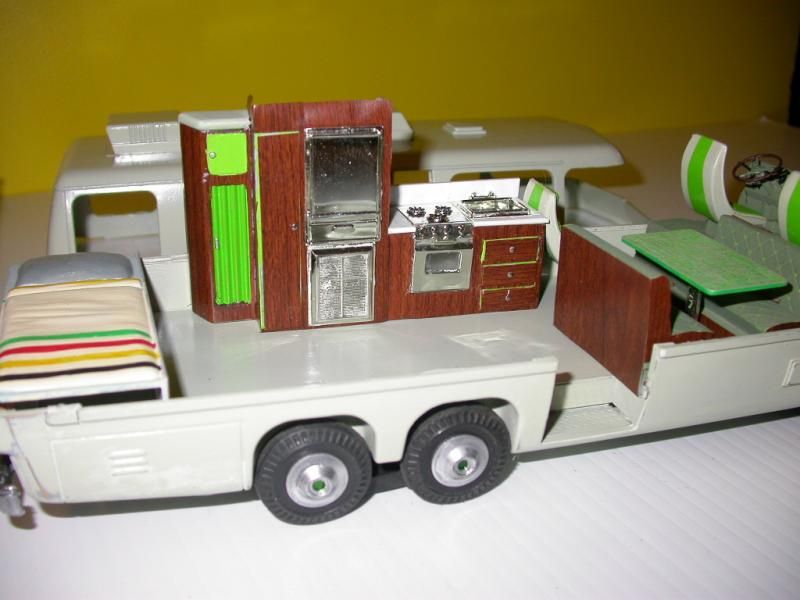 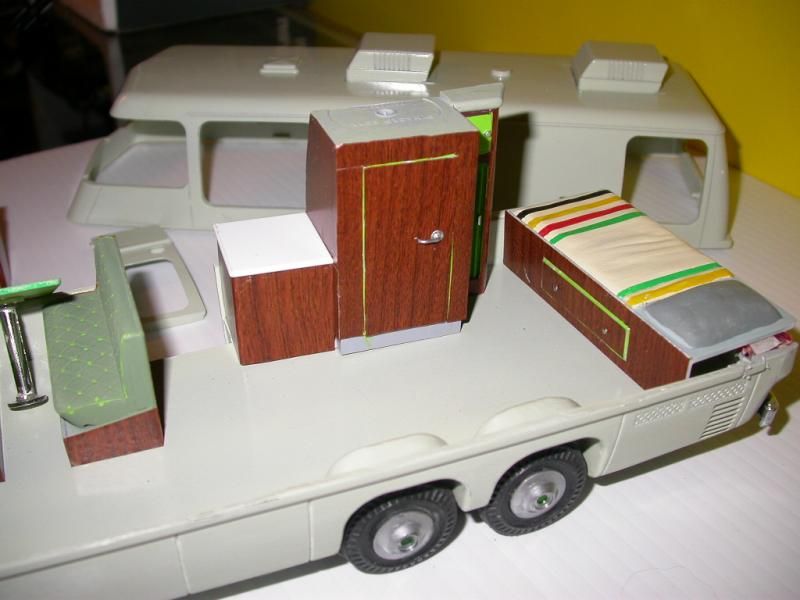 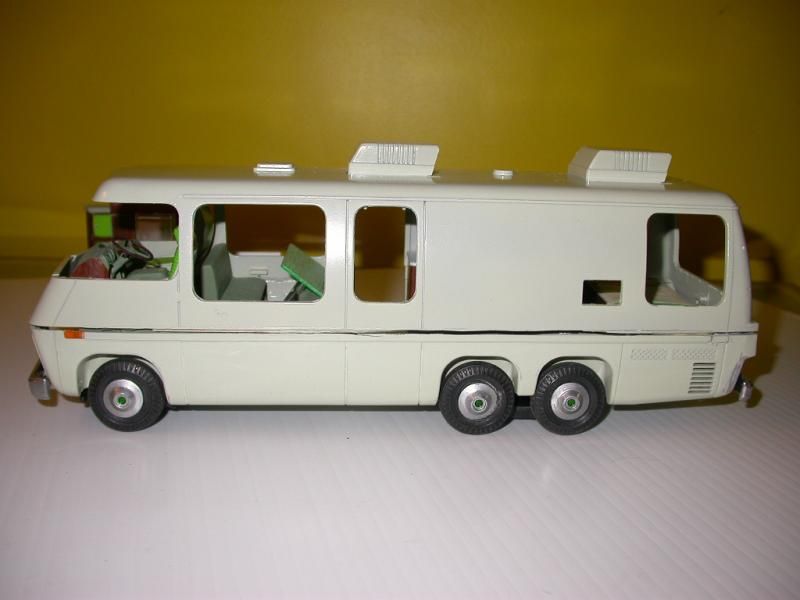 The upper hull is ready for window installation. Thanks for looking Carl |
|
|
|
Post by ap40rocktruck on Dec 12, 2013 13:57:57 GMT -8
Coming along very nicely! What are you planning for the outer color or is that it?
Ap40
|
|
|
|
Post by dptydawg on Dec 12, 2013 17:32:14 GMT -8
Richard the outer colour is on it. it is a pale green made by krylon called celery. It gets washed out with the flash and florescent lights. It does look like a colour that might have been used back then by GMC.
Carl
|
|


